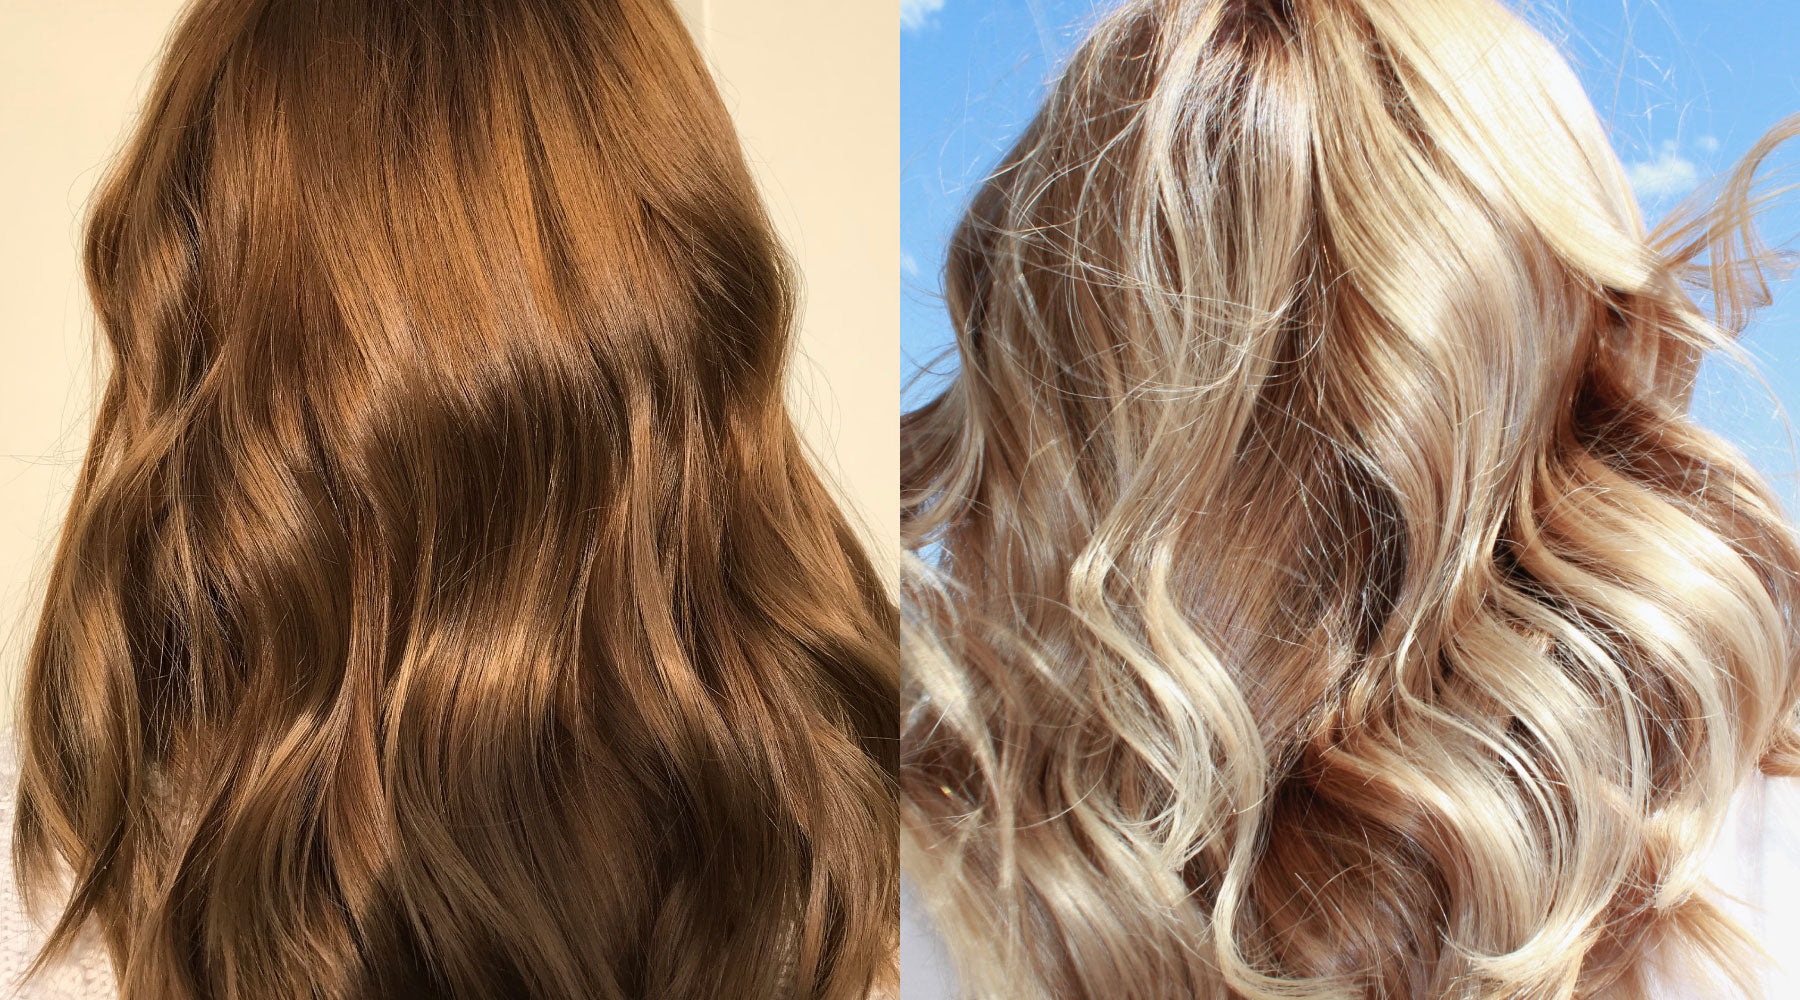
When Spring hit, I felt it—that familiar itch to reinvent. I’m a seasonal Colourer through and through. As soon as the days started warming up and the light shifted, I knew: it was time to trade in my cosy winter Salted Caramel Blonde for the lighter, brighter Blonde I always come back to.
Winter Me was all about warmth and depth—something closer to my natural Colour that let me slack off on maintenance. But Spring Me? She’s a Light Blonde daydream who’s ready to sparkle. So I reached out to a My Hairdresser Colour Consultant to help hatch a game plan and map out my Blonde comeback, minus the bleach and salon-sized bill.

Step 1: Plan the Blonde Comeback
First stop: Hanna, my go-to Colour Consultant (aka Hair whisperer). She asked all the right questions so we could build my Colour strategy together.
Current Colour: Salted Caramel Blonde
Natural Colour: 7 Medium Blonde
Hair Texture: Thick
Goal: A natural-looking Light Blonde—around an 8 Light Blonde—with a pearly finish. I wanted to embrace any light streaks already living in my Hair, keep my roots a bit darker for that soft regrowth line, and add a sprinkle of casual Highlights to brighten everything up.
Low-maintenance but luxe? Always.


Step 2: Clear the Slate
First thing’s first—we had to break up with my Salted Caramel. Enter: our Colour Remover. I swear, it’s like magic. You pop it on, and watch your old Colour fade like a sunset. No bleach, no stress. Just transformation in real-time.

Colour
Remover

Because my Hair had some Colour Build Up, Hanna recommended a double cleanse: two rounds of Colour Remover to really reset things. And she was so right.
After the first application, I was shocked—in the best way. Most of the caramel tones vanished, revealing a soft, Light base. I chilled for a night and went in again the next day with round two, this time using an applicator bottle for a quicker, more targeted application.


Products Used: Colour Remover, Tint Bowl and Brush Set, Applicator Bottle, Sectioning Clips

Step 3: DIY Highlights (But Make It Chic)
After waiting the full 48 hours post-removal (you must!), I broke up my Colouring process into two parts: Highlights and Regrowth. Much more manageable.
I'm not a fan of the foiled tiger-stripe vibe, so I teamed up with a fellow at-home Colourer—because friends don’t let friends highlight alone. We took turns painting each other’s Hair with freehand Highlights: heavier through the front, softer and more scattered through the back. We even used makeshift foil strips (cut from old pieces!) to separate the Highlights.

Highlight Mix: 10.2 Very Light Beige Blonde + 30 Volume Developer. Cool enough to tone leftover warmth, light enough to nail that pearly vibe.
Products Used: 10.2 Very Light Beige Blonde, 30 Volume Developer, Sectioning Clips


Step 4: Root Revival
Once the Highlights were in, it was time to tackle the roots. Beige is my forever Colour. I love how soft and iridescent it is, and how well it balances the natural Warmth I throw.
We went with 8.2 Light Beige Blonde + 20 Volume Developer for my Regrowth. I painted the Colour from my roots down to the start of my Highlights, with a few sneaky lowlights blended in to keep things feeling dimensional and natural.
When I had 15 minutes left on the clock, I whipped up a quick toner using the Pearl Blonde Toner Kit (10.2 + No Lift Developer) and combed it through my ends to even everything out into one cohesive, creamy Blonde.
Products Used: 8.2 Light Beige Blonde, 20 Volume Developer, Pearl Blonde Toner Kit


Step 5: The Secret Sauce
Want to know Hanna’s best tip? Once your Colour is applied and processing, comb it through with a Wide Tooth Comb. Game. Changer. It helps blend all the transitions—Regrowth to Highlights to ends—for a seamless, salon-worthy finish.

Wide Tooth
Comb
The Final Look
Fresh, creamy, multi-dimensional Blonde. No bleach. No drama. And no awkward root line haunting me in two weeks.

The best part? I did it all at home, with our salon-quality products and a little help from a friend. I saved myself a fortune on salon bills and got the exact Colour I wanted—with none of the guesswork.
So if you’re itching for a Blonde reset but not the bleach damage or the salon price tag, trust me: our Colour Remover and the right My Hairdresser mix will get you there.


