
We take our Colour Matching pretty serious over here at My Hairdresser, and when an image is so popular on our Instagram it just makes sense to do a How To. We love this style because it is so attainable, particularly for those of you who want to keep your Natural shade, but want it spiced up with some Hair Colour. You want to add energy, dimension and a little style into your Colour? Follow our step by step guide to begin!
The keys to this Hairstyle are:
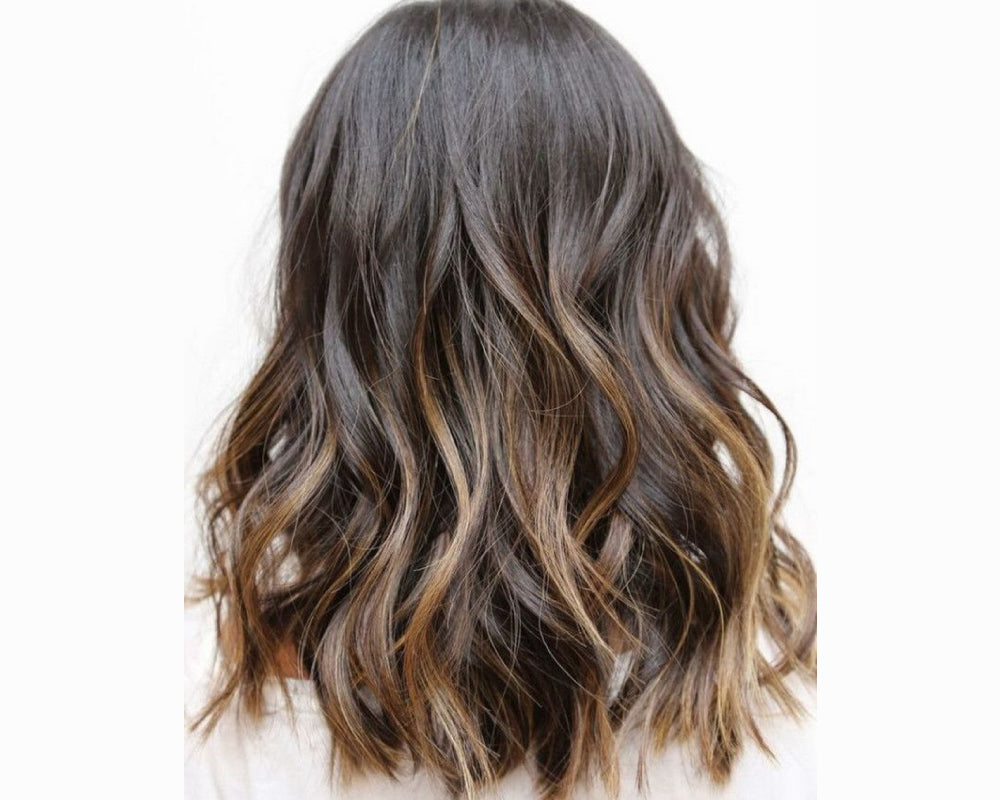
To have a beginning base of a Natural (Colour Free) Brunette.
To keep your Highlights small, no larger than 1/2cm. They are meant to be light, Natural and subtle.
Don’t group them all together, allow adequate breathing room between them.
Focus the majority of your Highlights towards the back and underneath of your Hair.
Don’t start your Highlights higher than your ears.
Use a light, feathering painting technique to apply the Highlights.
You will need
A Light Blonde Colour. We like to use an 8 Light Blonde or a 9 Very Light Blonde.
A 30 Volume or 40 Volume Developer, strong enough to get the desired lift.
Tint Bowl and Brush.
A good comb.
Foil cut into rectangle pieces, long enough to cover and seal your Highlights.
Sectioning Clips.
How To

Step 1
Start with well brushed, dry Hair. Using a middle part, divide your Hair into 4 clear Sections. Clip each section.

Step 2
Begin the Highlighting in the lower sections, doing each section at a time. Firstly we need to create horizontal rows, where we will place the Highlights throughout the Hair. This placement will give your Colour dimension. Starting at the top of the section, use your comb or the end of your Tint Brush through your Hair to create a row that is around a centimetre thick.

Step 3
From your row, pull out pieces of Hair that will be your Highlights - remembering to keep them small. Do a few Highlights, keeping a fair distance of breathing room between. The aim is not to stack a lot in the Hair. Do enough to cause effect, but not too many that it will look like stripes. The amount will differ based on your Hair thickness.

Step 4
Starting 1/4 of the way down from the scalp, turn your Tint Brush to the side and begin painting your Highlights. Stagger the Colour so the top of the Highlight does not appear as a straight line. Cover each Highlight with foil to prevent the Colour from spreading. Once you have finished your row, clip the Highlights and remaining un Coloured Hair from the row, up with a Sectioning Clip.
TIP: If you don’t want to use a Tint Brush, apply your Colour by using your thumb and index finger and dragging it down the Highlight.

Step 5
Begin your next row around a thumbs distance below your previous. Continue the same process, applying the Highlights with a brick effect, so they do not sit directly under each other. Continue until you reach the base of your Hair. Once finished, continue onto your other lower section. Try to keep the rows from each section inline, for a fluid look through the Hair.

Step 6
Move to the top sections. This area needs less. Leave more space in between the rows and use less Highlights. Imagine you don’t want the Blonde to start any higher than the top of your ears, until you reach the front of your face, where the Highlights can be painted slightly higher than your ears to frame the face.
Step 7
In the last 10 minutes of processing or application, open the foils up and spread the Colour mixture up the Hair strand slightly, to soften the start line of the Highlift for a nice gradient. Process Colour as per instructions. Wash and condition as normal!
Now we have shown you how to achieve this Colour, we want to see it!
Tag us @my_hairdresser so we can see you and your new do!


