Who doesn't love a balayage? The simplicity, the style, the low maintenance upkeep — it's a winner. But you know when you're done, you're done and it's time to try a new style, so what's next? Do you crave to return to your Natural roots or back to a pure single shade — to get your best new hue you're going to need to fill in those Light Blonde ends of your Hair to achieve an all over smooth sparkling shade.
Don't make the mistake of thinking you can just press rewind on your balayage by throwing a Darker Shade all over. You'll be left with an uneven Hair Colour tinged in green or grey tones, creating more work for yourself. I love you for thinking this is a job for Colour Remover, but unless you're removing the Darker base Colour you've been applying at the top of your Hair, not even Colour Removers magical powers can remove Lightened Hair Colour pigment.
Your next step involves 2 parts and is, in our opinion, the undisputed technique to reverse your balayage. I've used this technique on my own Hair so I can tell you from personal experience that one extra step pays big dividends. Of course, if you're not undergoing such a drastic Colour change, the extra step may not be needed, but we'll work that out soon. What are we waiting for — let's get started.
Pre Colour
As always, we need to work out what Hair we're starting with and where we want to go. Answer these questions:
What is your Natural Hair Colour?
How Light are your Highlighted ends?
What is your all over goal Hair Colour?
Step 1: Fill Your Ends
When your Lightened Hair is more than 3 shades Lighter than your goal Hair Colour, you need to begin by filling your Lightened ends to give your new Colour something to hold to and build off. Applying a Colour Filler through your ends adds the pigment so desperately needed back into your Hair to help you achieve the smooth, solid Colour you are looking for.
Your Colour Filler has to be two things:
A Warm Hair Colour.
Colour that sits somewhere between your Lightened ends and goal Colour.
To find out how to choose your Colour Filler click here.

Mix your Colour Filler with No Lift Developer and apply your Colour Filler throughout your ends, ensuring your Colour mixture is only applied to your Lightened Hair. Process your Hair Colour as per instructions.
If your Colour change is less than 3 shades darker, skip this step.
Step 2: Apply Your Goal Colour
Mix your goal Colour with the Developer of your choice.
Choose either a No Lift Developer or 20 Volume Developer depending on the kind of coverage you require.
A No Lift Developer is enough to Colour Hair darker.
A 20 Volume Developer will Lighten your Natural Hair up to 2 Shades or offer the best Grey coverage.
Apply your Colour mixture to your Natural Hair Colour first. Once you have covered your root area, apply over the rest of your Hair. Process your Hair Colour as per instructions.

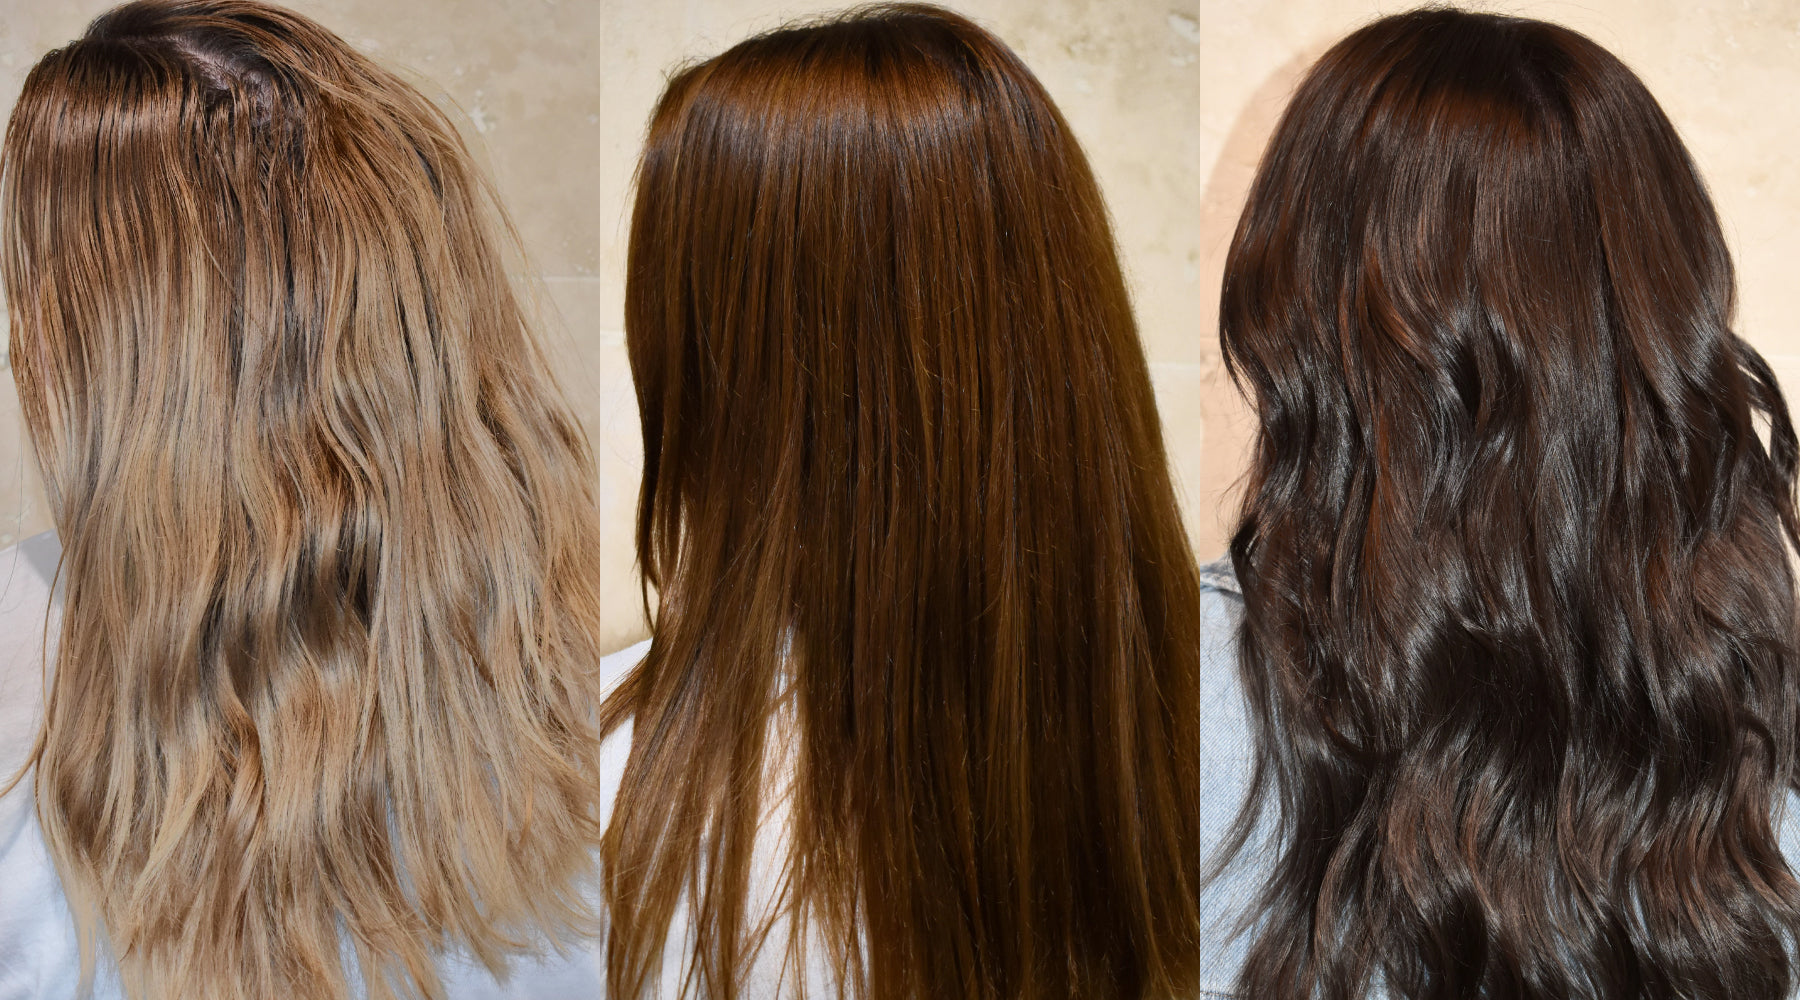
Watch Ana's Colour transformation.
Here's what she did in her own words:
So as you recommended, in the first step I used the 7.3 Golden Blonde Colour Filler with No Lift Developer to fill the lightened areas (Picture 2). In the second step (after 2 days) I used the Milk Chocolate + 20 Vol Developer (Picture 3). Thanks so much for your assistance, you were super helpful!


